Setting up the printer
Found under admin area "System and device settings" > "Printer" > "Printer setup".
Printing is split across two areas on purpose:
- Which device prints and how the picture reaches the paper — here, with the device. Applies to all events.
- Whether and how often anything is printed — with the event, under "Print". No printing at the company party, two copies at the wedding: same booth, same paper, different party.
Preparing Windows#
The printer has to be installed in Windows with the correct paper size in the driver (usually 6″ × 4″). Whatever is set there is what the software uses.
Main printer#
- Under "Main printer" pick the mode:
- Single printer — the normal case.
- Printer pool — several identical printers share the jobs.
- Disabled — this booth does not print.
- Select the printer from the list.
- Run a test print. If it succeeds, the setup list ticks off "Set up and test the printer".
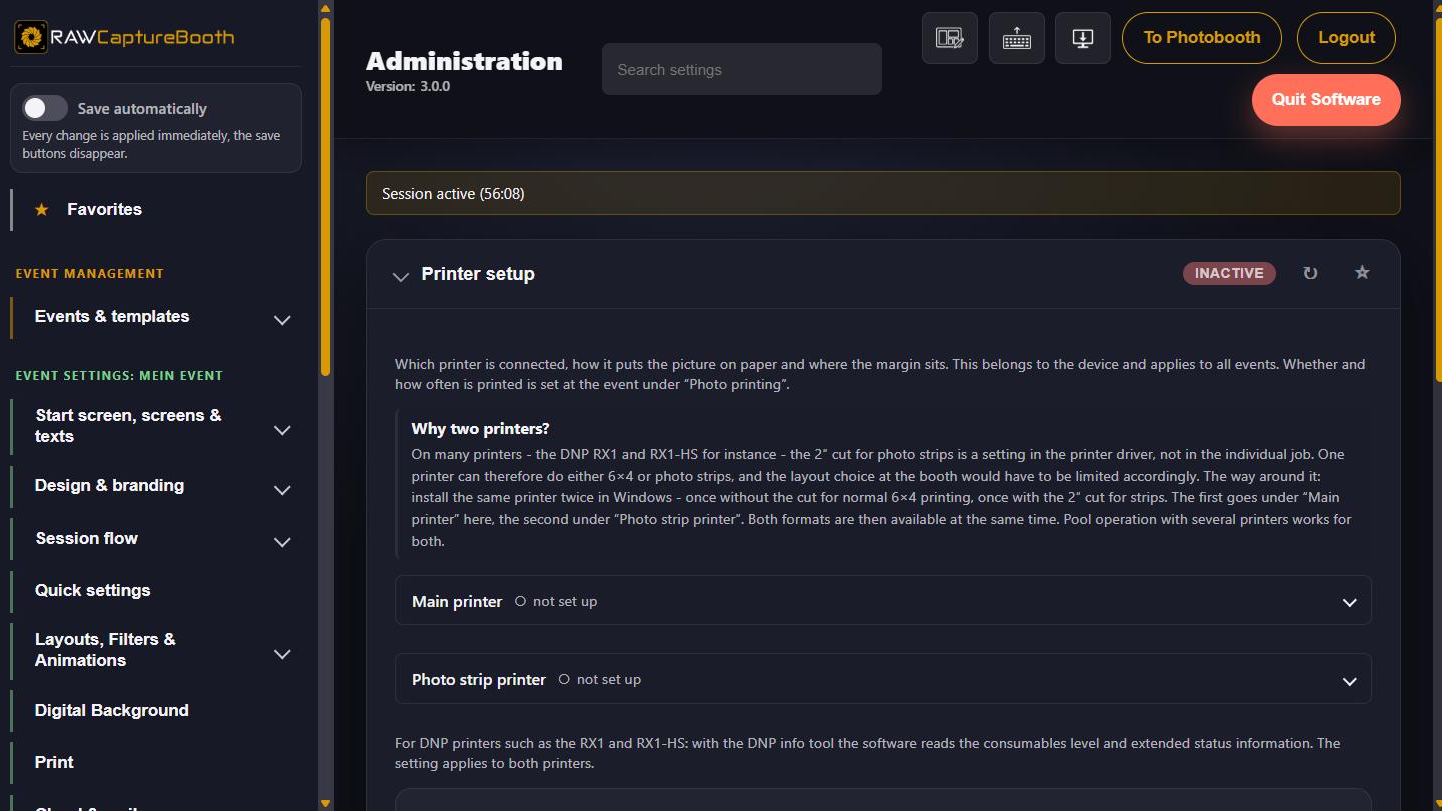
Photo strips: one printer or two#
The 2″ cut for photo strips is a setting in the printer driver, not in the individual job. There are two ways to deal with that.
One printer, cut set up#
The section "Photo strip cut" sits inside "Photo strip printer". The cut is set up there once per device; after that RAWCaptureBooth applies it to every photo strip job itself. The same printer is then the "Main printer" above and the "Photo strip printer" below, and both formats run at the same time.
Setting it up:
- Click "Set up". For known devices the assistant names the setting you are looking for — on the DNP RX1 and RX1-HS, for instance, "2inch cut" with the value "Enable".
- "Open driver dialog". The familiar printer driver window appears. Set the named option there and confirm with OK.
- Optionally print a test sheet: two panels with a cut line between them. It shows at a glance whether the sheet was cut, whether in the right place, and whether the margin is right. To skip it, choose "Keep without test print".
- "Yes, keep this" stores the setting permanently.
> The printer driver dialog appears on the booth computer. This step therefore cannot be done via > remote access; the assistant says so.
In a printer pool every device is set up separately — the cut is a setting of that printer's driver. A list shows for each printer whether it is already set up. If one device is missing it, photo strips come out uncut as soon as distribution falls back to it.
If the driver changes — after an update, for example — the stored setting no longer matches. It is then not used and marked "no longer matches the driver" in the list; setting it up once more is enough.
Two printers, as before#
Add the same printer twice in Windows:
- First queue without the cut — goes under "Main printer" in the software.
- Second queue with the 2″ cut — goes under "Photo strip printer".
This route keeps working unchanged. If your printers are already set up this way, nothing needs to change. Pool operation with several devices is possible here too.
Printer pool#
The pool spreads jobs across several printers — meant for events where one device cannot keep up or where a paper change must not stop the queue.
| Setting | Meaning |
|---|---|
| Pool distribution | The rule by which the next printer is chosen |
| Preferred printer | The device served first |
| Return to preferred printer | Go back to the preferred device after a detour |
| Switch printer after copies | Change device after a fixed number of copies |
| Split jobs | Spread large jobs across several devices, from a configurable number of copies |
The software watches the devices and shows which printer is online, which reports an error and what is queued.
Aligning the margins#
Hardly any printer hits the paper exactly. There are two levels for that:
- Per-printer correction ("Correction top/bottom/left/right") — compensates for the quirks of the device. It belongs to the printer and stays the same across all events. "Test print on this printer" checks the result, "Reset correction" starts over.
- Offsets with the event — move the artwork inside the printable area, for example when a layout is meant to have a wider white margin.
DNP info tool#
For DNP printers such as the RX1 and RX1-HS the software uses the DNP info tool to read the consumables level and extended status information — in other words, how many prints the loaded media still has. The tool's folder is entered under "DNP info tool"; the setting applies to both printers.
Some Citizen photo printers are identical in construction to DNP models and respond to the same queries. The Citizen CY-02 is confirmed, further models are possible but untested. They are set up exactly like a DNP printer.
When it does not work#
| Symptom | Cause and remedy |
|---|---|
| No print comes out | Printer offline or paused in Windows. Check the Windows queue |
| Picture is skewed or cropped | Wrong paper size in the driver, or the per-printer correction is missing |
| Strips print as 6 × 4 | The queue without the 2″ cut was entered for strips |
| Printing stalls, jobs pile up | Paper or ribbon empty; the queue continues after reloading |
| Guests print too much | With the event under "Print", limit the maximum for guests or turn off the copy selection |